June 28, 2008

back-to-business spiced breakfast bread

Well, I've tidied the kitchen a little, and I'm also coming to terms with the fact that our oven is apparently quite erratic.

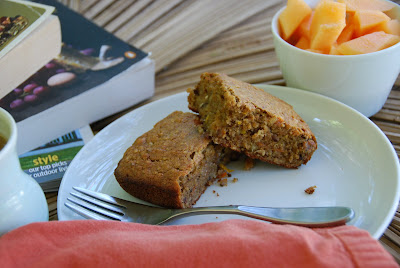
So, it's back to business, or at least back to attempting to share some food with you. I woke up this morning, spotted an overripe banana and decided to bake something with it. In the name of inching my way to healthier eating, I mixed up Rose Levy Beranbaum's banana bread recipe with whole wheat flour, oat bran, and some veggies. Next time around, I'd go for even more carrot, nuts, and texture, adding some bulgur, rolled oats, or steel-cut oats.


Spiced Breakfast Bread
Adapted from Rose Levy Beranbaum's The Bread Bible

1 overripe banana
1/2 C yogurt
1 egg
zest of one lemon
1 t vanilla
2/3 C wheat pastry flour
1/3 C oat bran
6 T sugar (preferably raw/turbinado)
1/2 t baking powder
1/2 t baking soda
1/4 t salt
5 T softened unsalted butter
1/2 C walnuts, toasted and chopped medium-fine
1 carrot, finely shredded
1/2 t cinnamon
generous dash of powdered allspice and/or ginger

Preheat the oven to 350o. Grease a loaf pan with butter and set aside.

In a small bowl, peel and gently mash the banana. Add the yogurt and mix the two until their thoroughly blended, about 2 minutes by hand. Add the egg, lemon zest, and vanilla and mix until smooth. Set aside.

In a large mixing bowl, measure the wheat flour, bran, sugar, baking powder, baking soda, and salt and stir briskly to combine, 1 minute.

To the dry ingredients, add the softened butter and half the banana mixture and blend until combined. Add the remaining banana mixture in two batches, mixing quickly and thoroughly in between additions. Mix in the cinnamon, ginger, allspice, carrots, and walnuts until just combined.

Put the mixture in the prepared loaf pan and bake 20-25 minutes or until the top of the loaf springs back when pressed lightly in the center. Remove and cool on a rack.

Yield 6 muffin-sized bars.

Happy Saturday!

June 27, 2008

time for a kitchen makeover

I'm really excited to do some cooking for this weekend, but before that happens, I must face... THIS!


Yes, I headed into the kitchen yesterday, and was so horrified by the more-deplorably-messy-than-usual state, that I had to document it. At least you can tell I've been busy! Pizza stone. Check. Bowl from mixer. Check. Mostly empty glass of white wine... check. Do I mise en place? Do I clean as I go? What do you think?

Even the sponge looks a little off-kilter. Or is he just considering ending it all?


Recipes to follow. I swear.

June 26, 2008

oven insufficiency alert

I was just avoiding work (again)--er, taking a little break--and reading this yummy brownie recipe EvilChefMom just posted and remembered:

My (rental) oven doesn't maintain temperature at all! I finally bought an oven thermometer which lead me to discovery #1: My oven runs 35-50 degrees cool.

Then! Two days ago, while baking my scones for the Strawberry Shortcake, I discovered (#2) that after 30 minutes of preheating at 450o, the oven was still hovering around 345o.

What to do? Anyone have any suggestions about helping my oven attain high heat? Besides moving, which is kind of in the works; or perhaps wrapping my oven in industrial-strength foil?

June 25, 2008

welcome to strawberry land, people

This dessert, while also my sister's first birthday cake, is also the namesake for one of my childhood entertainments: Strawberry Shortcake! She was just so cute with her big floppy hat and freckles. How strange is it that we had a cartoon character borne of a fruity dessert? And get a load of the other characters: Huckleberry Pie, Rainbow Sherbet, Crepes Suzette, Seaberry Delight?! (That last one was from season 2; apparently they were pulling out all the stops at that point.)

Strawberry Shortcake Cartoon *The World of Strawberry Shortcake*


Ah, I recall fondly the faintly dusty strawberry scent of my Strawberry Shortcake doll's hair, as I tucked her into her white plastic gazebo... Oh! Where was I?


Sorry, no photos of the complete dish survived my work group potluck. That, and I forgot my camera. 

Strawberry "Sconey" Shortcake
Hah. Sorry about the corny alliteration. Sounds like Shortcake's streetwise cousin from across the pond, no?

1 batch of my
favorite scone recipe*, adding 1/3 C sliced strawberries and 1 t lemon zest
2 C sliced strawberries
1/3 C granulated sugar
1/2 t cinnamon
1 C whipping cream, plus more for serving
1 T amaretto liquor or 1 1/2 t Grand Marnier
1/3 to 1/2 C powdered sugar

*As an alternative, you can make the Strawberry Shortcake recipe on the Bisquick box! That's how my mom made this dessert, and I always loved it.

Step One: Slice your strawberries, put them in a bowl or container and toss with granulated sugar and cinnamon. Set aside and refrigerate for 2+ hours.

Step Two: Bake and cool the scones.

Step Two: Whip the whipping cream and liquor on high (in the bowl of a mixer or by hand), adding powdered sugar until it's the right amount of sweet for you. Adjust liquor/sugar as desired.

To serve: Place scones in individual dishes, drizzle with 1-2 T liquid whipping cream, top with 1/3- 1/2 C strawberries and juice, and add a dollop of whipped cream. 

Add vanilla ice cream, if this doesn't offer you enough varieties of sweetened dairy yet. 

Yield: 6 generous servings

June 24, 2008

I heart Texas!!

I heard some lyrics in a song today that reminded me of how easy it is for people in other parts of the country to lay the blame for the current administration on the state of Texas.

Well, I just needed to say that the next time someone makes a snide remark about how Austin's the "only place in Texas one can live" or some similarly superior and narrow-minded comment about the generally disposable nature of my state, I might go freakin' ballistic.

I wasn't even born in Texas, and I'm proud to be born in California and raised mostly on the east coast; but (dang it!) I love Texas dearly, despite the hotter-than-hell Septembers and the other obvious downsides to living in a red state!

So, the next time you think about writing off the Lone Star State, please think of me and consider giving us a chance. Thanks. Y'all. xoxo

June 23, 2008

pizza margherita perfetto

I'm emerging from my weekend at the beach and my long and tedious day back at work. Whew! Why the hell don't we embrace the 4-day work week again? Well, while you ponder that one (and write your congress person or CEO), and I watch Dr. Strangelove out of the corner of my eye, here's a catch-up from last week:

So I was following SmittenKitchen's pizza-making posts the last week or so (she was on a kick, but it was a good kick indeed!) The lovely and talented lady has wiped away (eh, virtually) my tears of pizza-crust-making frustration.

Check out her recipe for Wine-and-Honey Pizza Dough here and tips for pizza-making here. Her dough was miraculously soft, sweet, and gluten-y! I always seem to end up with pizza dough that wants to tear and fill with holes, but this baby had wonderful texture.


Simple Margherita Pizza
based on SK's pizza tips above

1 batch Wine-and-Honey pizza dough
2-3 cloves garlic, minced
1 T olive oil
10 cherry tomatoes, cleaned and stems/flaws trimmed
1/3 C white wine
1/2 t red pepper flakes
1/2 t sugar
3/4 t salt
cornmeal, 1-3 T approx.
3/4 C shredded mozzarella
1/2 C fresh mozzarella, torn into large (1 inch) chunks 
1/3 C fresh basil, torn

Make the pizza dough 2-24 hours ahead of time. I made my dough too late in the evening, so once the dough was rolled out into the desired shape (rectangular for me), I placed it between two sheets of plastic wrap, rolled it up, and covered the ends of the roll with another piece of wrap. When ready to make dinner the next night, I took the pizza dough out about 15 minutes prior to baking, at the same time as preheating the oven to 400o. (If using a pizza stone or cast iron pan, place it in the oven to preheat as well.)

To make the sauce, first bring a small pot of water to a boil (just 2 cups or so), adding the tomatoes and poaching for 1 1/2 minutes. Remove from the heat, cool the tomatoes with cold water, and remove the skins. (I had to squeeze the little tomatoes till they popped; then the skin slid right off.) Set aside.

Heat the olive oil in a saute pan for a minute or two on medium high. Add the garlic and red pepper flakes and cook another minute or two, then add the tomatoes and reduce the heat to medium. Add wine, sugar, and salt; and cook on medium 30-45 minutes, until the tomatoes have broken down.

Place your prepared pizza dough on your surface of choice. I find the best option is my makeshift pizza paddle: a piece of cardboard approximately 12 x 12 inches, with a 2-inch folded edge I use as a handle. Coat your surface generously with cornmeal, placing the dough on top. Brush the pizza with extra olive oil, and dust with a small amount of kosher salt, if you wish. Spread the tomato sauce over the crust, then top with the two kinds of mozzarella and basil.

Transfer your pizza from the prep surface or pizza paddle to either a baking sheet coated with cornmeal or to the preheated pizza stone or cast iron pan. Bake 10-15 minutes or until the crust is a dark golden brown.

Remove from the oven, cool 3-5 minutes, cut and serve.

Yield one large pizza.

recipe for sunburn

Yes, I've been quite the slacker the last few days: Not what this fledgling project needs! I promise to bake or cook something interesting for you, my zero to four readers, by Wednesday (my department potluck!)

In the meantime, I'll be recuperating from this:

1 fair-skinned and freckled woman with moderate sun-damaged skin
12-16 hours over 2 days in full, midday sun
3 varieties of sunblock, ranging from 6-50 SPF

Go to beach. Do not invest in an umbrella or other sunshade. Add fair-skinned woman and friends. Apply sunscreen inconsistently and swim frequently. Slowly remove suncreen by swimming and jumping in the water and lying on towels and lounge chairs. Bake gently for 4-7 hours/day.

Optional: Remove giant sun hat if sun damage is also desired on face. I didn't use this, but may try it sometime in the future!

Yield: One silly sunburn and increasingly spotty shoulders and arms.

June 15, 2008

chocolate sugar cookies, revisited

This is a post-script from last week's "no substitute" post. Upon further inspection, I've decided to leave a modified recipe from what I originally saw as a failed attempt:

The original recipe featured huge, dense, crackly, larger-than-life chocolate cookies. I rediscovered it in a mid-week stress-hormonal craze and could not wait to sink my teeth into those chewy dark chocolate babies!

Low and behold, due to my various ingredient substitutions--go figure--the outcome was a thinner, crispier version and I was terribly disappointed.

I've reconsidered my first verdict, however. The flavor in these sugar cookies is so satisfying and will of course improve with a good Dutch-process cocoa. I've been sharing them with friends all weekend, and everyone agrees that they're darn tasty. They would be fabulous over ice cream or as the cookie for an ice cream sandwich. Here's the recipe. See for yourself.


Chocolate Sugar Cookies
(adapted from Martha Stewart Living)

1 1/2 c all-purpose flour
1/2 to 3/4 c unsweetened Dutch-process cocoa powder
1 t baking powder
1/2 t salt
1/2 c (1 stick) softened unsalted butter
1 1/2 c vegetable shortening -- for flatter, crispy cookies, use SmartBalance shortening or butter
1 large egg
1 1/2 t vanilla extract

Preheat oven to 375o. Line 2 baking sheets with parchment paper.

Whisk the dry ingredients together in a bowl and set aside. Cream butter and sugar together (by hand or mixer), until fluffy and pale. Mix in the shortening. Then add the egg and vanilla and mix until creamy. Gradually add the flour until just combined.

Drop the cookies (in the size of your choosing, but the recipe calls for huge ice cream scoop-sized portions) on baking sheets and bake until edges are firm, 18 to 20 minutes. (It actually didn't take quite that long for me.)

Cool and serve as desired.

Yield 12-16 large cookies.

accidental kolaches

I awoke this morning wondering what I should do with my remaining brioche dough and knew I needed to (a) make more rolls, because Adam when crazy for them; and (b) make something savory because I was craving meat and cheese. I ended up keeping things simple (not the first time), particularly since (a) it was early, (b) I hadn't shopped for produce in a week, and (c) besides, I like simple!


I began with the same pull-apart bread (okay, it's nanterre to be precise) we made yesterday, but instead of placing 8 rolled sections of plain dough in a pan so that they bake into a neat little sectioned loaf, I put chopped ham and shredded cheddar and swiss cheese inside the loaf. What I came up with, low and behold, tasted just like a breakfast kolache. Turns out, kolaches--at least the ones made by German and Polish Texans--are made with brioche!

10 oz brioche dough, chilled (see previous post)
1 c sliced ham, diced
1/2 c cheddar and/or swiss cheese
1 t butter
1 egg yolk

Preheat oven to 350o. Melt butter in a small container, brush the bottom and sides of a loaf pan, and set aside.

To prepare, I took about 10 oz of brioche dough and shaped it into a roll, then portioned the roll into 8 equal pieces. Take each piece, and flatten it into a square with the palms of your hand. Place about 1-2 T of ham and 1 T cheese in the center of each square, and then roll it into a nice little tube, sealing all the edges.


Each roll should be of similar size, shape, and length; and they should fill the pan like a family of sardines. Once in, use a sharp scissor to cut each "log" in half.


Brush the tops with the egg mixture, and pop them in the oven for 15-20 minutes, until the top is nice and golden brown.


These were delicious and would be a great side for a brunch, and probably even better to make Monday at the office a more pleasant event. I'd like to get more creative next try, and add some mushrooms, different cheeses, greens, or herbs.

Also, isn't this shape prettier? I'm going to try larger sections next time.

June 14, 2008

do the do the brioche

Saturday, I spent my morning learning the fundamentals of making brioche. Originally, I was taking the class as sort of sloppy seconds to the boule/French bread class, which was full. As with any Saturday morning informal class, there was a motley assortment of bakers, from the know-it-all to the silent perfectionist and the quirky mother-daughter duo.


I had forgotten how my normally slackeresque persona morphs to a focused a-type when I'm in a classroom setting and really want to get something out of the class. Our instructor, chef Amy Osborne, was great. Very informative about technique as well as the history and the science of the bread.

You probably already know this, but brioche is a rich dough, which means it has a high quantity of sugar and fats and/or eggs. Because of the high fat content, the dough will be a bit more moist and yields a softer and richer texture.

Basic Brioche
(from Amy Osborn)

Sponge
4 oz milk
.33 oz instant yeast
4 oz bread flour (more imporant than I thought, though "AP," all purpose, is the next best thing)

Dough
7 oz eggs (probably 4 avg-sized, with yolks)
1 lb bread flour
1 oz sugar
1/4 oz salt
7 oz butter, softened and cut into large chunks

Sponge:
In a small saucepan, warm the milk to 100o, or until you just barely sense it's warmed by testing with a finger tip or the inside of your wrist. Put the milk in a large mixing bowl, and dissolve the yeast in the milk. (You can stir it around, mix with fingers, etc., until yeast is almost all dissolved, approx. 1-2 minutes.) Add flour and mix by hand until it comes together. Cover tightly with plastic wrap and allow to double in size. (You can speed this up by placing the bowl in a sunny spot or on an oven with the pilot light on. Don't over do it though: Once the temperature goes above 90 degrees, the fermentation will begin to slow.)

Put the sponge in the bowl of your mixer and gradually add the eggs and then the dry ingredients. Combine for about 3 minutes on low, adding the butter slowly. Increase the speed to medium for another 3 minutes, until the dough comes together. It should be consistent, smooth, and very soft and tacky to the touch. (My dough was was actually pretty darn moist, and not entirely smooth, but the brioche came out pretty well anyway!)

Place the dough in a lightly sprayed plastic storage bag or covered bowl in the refrigerator overnight to ferment.

Within two days, use the chilled dough to create the brioche form of your choice.

Yield 2 pans of cinnamon rolls or about 2 dozen rolls.


I have very little wisdom to impart thus far down the brioche path (or that of the bread baker for that matter), but what I've learned so far is
  • When warming the milk, the heat should barely be perceptible to the touch. Too hot, and you'll kill or at least inhibit the yeast.
  • As you mix the dough, start at 3 minutes on low and then increase to high for 3 more minutes. If, by the end of the first 3 minutes, the dough looks very moist and does not seem to be coming together, be at the ready to sneak in a touch of flour (about a teaspoon at a time) until the texture becomes more consistent but is still very porous and sticky.
  • At the end of mixing, the dough should be dry enough to touch lightly but wet enough to stick to the bottom of the bowl or to a too-invasive finger. (Dirty!)
  • If glazing by brushing the dough with egg, be conservative: Too much egg running into the pan risks your bread sticking at the end of baking.
  • Brioche is good for hangovers (mine) and picky husbands who often are not impressed with your cooking (also mine).
  • It's a good idea to rotate bread once during baking to overcome hotspots. (I realize most cooks already know this, but I've yet to incorporate this into my own repertoire!)
In three hours, I'd made a pan of cinnamon raisin rolls, brioche a tete, and a pan of small pull-apart rolls perfect for a dinner party of family gathering. Not only that, but we also went home with a batch of dough that I'll be doing... something... with Sunday! Turns out the class wasn't a disappointment in the least.


Stay tuned and see how I may or may not screw up the lovely dough that awaits me in the fridge.

June 12, 2008

no substitute

Exhibit A:


Exhibit B:


Our lesson: DO NOT use SmartBalance shortening substitute!! (Sorry, SmartBalance people.)

Damn, those cookies in the magazine looked so tantalizingly chewy and rich! Admittedly, I also did not properly let the butter arrive at room temperature before trying to cream it with the sugar. God, I hate wasting all those ingredients! The picture doesn't do my version justice: These were a hard and somewhat gritty disappointment.

No recipe, since I have NO idea if these are any good. Better luck next time!

Postscript: Once I recovered from the shock of the crisp texture of these, I realized they aren't all that bad.

Baked with the substitute fat (SmartBalance), these have a texture akin to ginger snaps, and would actually--as my deskmate Debra pointed out--be great for ice cream sandwiches or just crumbled over vanilla or mint ice cream!

June 4, 2008

crescent roll joys part two: tomato, shallot, and mushroom pesto pizza

Now, I've heard that pizzas are really best with one or two simple ingredients. This one is not that. In fact, the jury's still out on whether we'd use the crescent roll crust again on this! Admittedly, the rolls are pretty damn buttery for a pizza; but it was a great way to have a savory fast dinner after a long walk around the lake.

Start with ye old crescent rolls and arrange in an ungreased pie pan thusly, until you have a nice little crust. Bake 10 minutes or so, until the crust is approaching a golden brown.

While the crust is baking, prepare your pizza ingredients. I chopped 3 plum tomatoes lengthwise, finely sliced a big shallot, sliced a handful of mushrooms, and shredded 3/4 cup of swiss and mozzarella cheese. I like my veggies to mellow usually, so I gave them a little spin in a saute pan with some hazelnut oil. (Yes, I swear I'll get off the hazelnut oil thing soon!)

When the crust is browned, remove it from the oven and drizzle it with the olive oil and follow that with the pesto. Layer on the cheese and toppings, along with any fresh herbs you desire. I threw in a few chopped basil leaves as well.

Increase the oven temperature to 400 and bake for 8 minutes, or until the cheese begins to brown and bubble.

Et voila! You're a cheater, and no hardcore foodie, but you got a fast savory pizza for dinner.

June 3, 2008

crescent roll joys part one: shallot and tomato frittata pie

This was spawned both by my grandmother's allegedly-famous-though-I've-never-had-any zucchini pizza and by an impromptu Sunday brunch with my girls.

I may have already mentioned that I'm somewhat obsessed lately with shallots. I also finally made it to the Sunset Valley Farmer's Market on Saturday and blew about forty dollars on fresh produce.

Soo, when four of us were off to see the Sex and the City movie on a Sunday morning and I decided that whatever I can come up with is better than the typical brunch offerings, I decided to employ the techniques rumored at a recent family gathering detailing Grandmom's fabulous zucchini pizza featuring a quick and flaky crust made of that family favorite: Pilsbury crescent rolls.

It turned out wonderfully, though I didn't GET A PICTURE, thought I'd share the basics:

1 8oz roll of crescent rolls
4 eggs, minus two of the yolks to keep things light
2 T milk
1 T olive or hazelnut oil
3 plum tomatoes, quartered
1 large shallot, sliced thinly
1/3 C finely chopped fresh rosemary and basil
1/2 C shredded Italian or Swiss cheese
salt and pepper, to taste

Preheat oven to 375o. Arrange the rolls in a pie pan and press seams together to resemble a pie crust. Bake for 10-12 minutes or until lightly browned. Remove from the oven and set aside to cool.

Whisk eggs with milk and add the cheese, then a pinch of salt and pepper. Heat oil in a saute' pan on medium high temperature and cook the tomatoes, shallots, and herbs until soft and until the shallots become clear. Remove from heat. Pour egg mixture into the saute' pan and mix with the veggies, then pour the mixture into the cooled crust.

Bake 8-12 minutes more, until the eggs have solidified and the top begins to brown.

beef and veggie skewers a la Derrick

I had to leave a quick honorable mention for my grill-mastering brother-in-law. While I was in town a few weeks ago, he whipped up these tasty skewers in about 20 minutes. I rarely barbecue, so this was a great reminder to haul out the charcoal and marinade.